During this module, I designed a character for which I would later use in an animated short. The character I created was based on the small illustration I made in the first week back to college; the slime skull. During the module, I gave the character a body, a basic back story, completed various turn around's, and created an expression guide. I named the character 'Goop', as I felt like it fit the character, being made of slime, but I felt like words like 'slime', 'sludge' etc. were too generic, but 'goop' is a less common word.
During the module, I feel my main strength was the way in which I experimented with and learned Adobe Illustrator, with the assistance of my tutor. During the module, I used features such as 'Pathfinder' and the 'Blend' feature to create the look of my character, with the descending 'slime' effect being made by 'cutting out' the shape of the skull from another shape, and then adding a blended shape behind it.
My main weakness during this module was that, on reflection, I really didn't do enough development work for my character; I generally just made the first thing that popped into my head and added it to the design. I also feel that I didn't put enough effort into the alternate poses for my character sheets, as I would have preferably liked to have more, and more varied poses. At least from this I can see these faults, so that I can work on not repeating them in the future.
The main opportunity this module opened up to me was to be more experimental in Adobe Illustrator, as before hand I pretty much just used the limited knowledge I had to create my illustrations, but now I am far more experimental, trying to make use of the many features available to create illustrations with far more interesting visual appeal.
In the future I aim to utilize the features I have learned about to create more interesting artwork and assets. I aim to play around with the software more, and try to learn more and more about the tools and features as I go along, as I feel this will help the quality of my illustrations, and allow me to create more visually appealing work.
Thursday, 18 December 2014
Thursday, 23 October 2014
Harry Partridge
For this module I need to list various artists and analyse/research them, so I thought I would list one of my favourite animators at the moment, Harry Partridge. This is mainly because of the quality of the frame by frame animation he creates, the use of dark/absurd humor in his animations, and the great, weird colour palettes he uses. Among my favorite animations of his are 'DR. BEES', the 'Starbarians' series, and 'Hitman Absolution: Hiding in Plain Sight'.
I mainly like this animation due to the fact that it's just so silly, and slightly dark, but it fits Harry's style so well. The animation is about a Wasp-themed super hero by day, Dr. Bees by night, and follows various scenarios involving bees. There are more videos involving Dr. Bees by Harry Partridge, but this is still my favourite.
This is the first episode of Starbarians, and is where we meet the two main characters, and see them 'face off' against an evil-doer. My favourite thing about this episode is the take on typical evil-trap type situations often seen in films.
Friday, 3 October 2014
Week 2 Overview/Targets
During the second week back, I was mainly working on developing my character both visually and story wise.
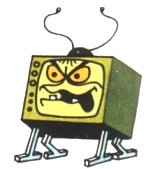
Early on in the week, I started coming up with ideas for my characters. One of the main ideas I came up with for a character was a person/thing with a T.V. for a head. My initial idea for its emotions and such was that as its mood changed, the images/images would change on the screen, as well as its face changing. The same goes for the antennae of the television, it would change shapes depending on the mood. For example, if the character is angry, the screen would show flames coming from the bottom, and the antennae would scrunch up and look spiky. If the character was sad, the screen would show rain, with water dripping down from the top of the screen, and the antennae would flop down in front of the screen. Ultimately, I decided not to use this character for my animation, or at the least, not as the main character. We also felt like the idea was too similar to characters from the past, like Evil Edna from Willo the Wisp.

Instead, I decided to use the character I made in Illustrator last week, the Slime Skull character, which is still to be named. I did this because after speaking with Dave, we both felt like the Skull character was the more creative character with more scope for an animation. Through the week, I began to flesh out my character, as well as starting to think of what kind of body he would have, since the original design did not include a body. For the body I thought of having it be in a similar fashion as the skull, made of slime, and to be strangely proportioned, at least to the point of not looking human (when not in his disguise, which I will get to). Because he is made of slime and generally a bit weird, he feels like he needs to fit in with 'normal' people, so he wears a disguise. The disguise consists of a large overcoat, large glasses, and possibly a hat and mask. While in his disguise, his proportions would also change to more of a 'human' shape, so that he fits in and doesn't bring attention to himself. I have yet to actually design and draw out my character in Illustrator, but I feel like I now have a better idea of what my character.
Targets for next week:
Early on in the week, I started coming up with ideas for my characters. One of the main ideas I came up with for a character was a person/thing with a T.V. for a head. My initial idea for its emotions and such was that as its mood changed, the images/images would change on the screen, as well as its face changing. The same goes for the antennae of the television, it would change shapes depending on the mood. For example, if the character is angry, the screen would show flames coming from the bottom, and the antennae would scrunch up and look spiky. If the character was sad, the screen would show rain, with water dripping down from the top of the screen, and the antennae would flop down in front of the screen. Ultimately, I decided not to use this character for my animation, or at the least, not as the main character. We also felt like the idea was too similar to characters from the past, like Evil Edna from Willo the Wisp.
Instead, I decided to use the character I made in Illustrator last week, the Slime Skull character, which is still to be named. I did this because after speaking with Dave, we both felt like the Skull character was the more creative character with more scope for an animation. Through the week, I began to flesh out my character, as well as starting to think of what kind of body he would have, since the original design did not include a body. For the body I thought of having it be in a similar fashion as the skull, made of slime, and to be strangely proportioned, at least to the point of not looking human (when not in his disguise, which I will get to). Because he is made of slime and generally a bit weird, he feels like he needs to fit in with 'normal' people, so he wears a disguise. The disguise consists of a large overcoat, large glasses, and possibly a hat and mask. While in his disguise, his proportions would also change to more of a 'human' shape, so that he fits in and doesn't bring attention to himself. I have yet to actually design and draw out my character in Illustrator, but I feel like I now have a better idea of what my character.
Targets for next week:
- Draw out my character in Illustrator, getting a better understanding of what his body is going to look like.
- Finalize a possible story for the character, as I only have a basic understanding at the moment
Friday, 26 September 2014
Week 1 Overview/Targets - Returning to College/Starting Year 2
This week, I returned to college for the second year. During the week, I enrolled for the second time, and took part in class activities.

One of the first things done in the week was a few unit overviews, using the module guides. This was done by Dave in class, with myself and the class listening and asking questions when needed. This was fairly straight forward, as we had done many of these overviews last year. After doing the module overviews, I enrolled for the second year of the college course, using my student finance paperwork.
We also discussed ideas this week, and what we had been up to over the break period from college. This was a group discussion and was fairly laid back. I generally spoke about how I had mainly been working on trying to improve my drawing skills, and working on a cartoon style for drawing characters.
On Friday morning, we had a session of Adobe Illustrator re-cap led by Dave, where we went over the basic tools and skills that can be used in the software. I found this rather enjoyable and actually produced some work I was happy with (which to be honest, is a rarity). The illustration I made was of a cartoon skull, made out of a slime like liquid. The idea for this came from a doodle I did in my sketchbook. The final product can be seen below.
I made this by first taking the doodle I had in my sketchbook, and taking it into Illustrator. After this, I used the Pen tool to create line work based on the original sketches lines. After doing this, Dave showed me a pretty cool technique that uses the Pathfinder window. Dave showed me how to 'cut out' the shape from a background shape by using this, so that only a silhouette remains in the background. After doing this, to create the slime effect, Dave showed me the Blend function. This effectively allows you to create a blend between two objects, such as two differently coloured rectangles. When you use the blend function on these shapes, the software will 'fill in the gaps', and transition any discrepancies, between the two shapes, by adding new shapes between them. After learning how to do this, I made a wavy, slimy-looking shape, and picked a colour. I then made another, with different bumps and troughs, and then picked another colour. After using the blend tool, it created a wave of colour, to put behind the shape with the skull silhouette on it. Doing this left the appearance of only the skull, with the slime on it.
For next week, I feel that I need to accomplish a few things:
- Develop my character/story for my animation: This is important because this first module is only short, and I need to keep track of my time.
- Experiment a bit more in Adobe Illustrator: Although this isn't vital to my success for this module, I feel like a bit more experience with this software could be helpful, as I personally enjoy using it, and I am a bit rusty after having a long period of time off from college.
- Create a list of characters that I like: Doing this could help inspire me for my animations, so it is a worthwhile task.
Thursday, 24 April 2014
Year Evaluation
Over the past
year, I have developed both personally and professionally. During the course of
the year, I have learned a great deal about traditional and contemporary
animation and illustration, such as the techniques used to create the pieces,
and the advance in technology, which encouraged these forms of media to
continue to grow, more and more rapidly.
One key thing
I have learned during the year is how to create and manage workflows, to assist
in completing projects in a timely manner. Creating a time plan for a project
is an integral piece of this, as it gives me an idea of how the project should
be running, and what tasks I should, in theory have completed by certain dates.
Obviously, these will not always be dead on, so it is important that I add in
at least some contingency time, to allow me to finish uncompleted tasks.
During the
year, I also learned how to use a several pieces of software, such as ‘Adobe
Illustrator’, ‘Adobe After Effects’, and ‘Final Cut Pro’, among others. Before
joining the course, I had no experience in using Adobe Illustrator, having
never used the program before. However, after being taught the basic tools and
features of the program in time tabled sessions, I quickly grew to enjoy using
the program, and particularly the pen tool. While I had used the pen tool in
Photoshop before, after using the Illustrator pen tool, I greatly preferred it,
as it gives you far more customisation tools, such as the style customisation
options available, available in the stroke options. After learning how to use
the software, I then continued to use it to create several illustrations during
the year, for projects, such as my Larry character sheet, and my Sewer Slime
piece. I also learned how to use Adobe After Effects during the year, another
software program I had not used before. After being taught by Dave on how to
operate some of the core features of the software, I, again, quickly grew to
like the program, and saw the potential of the software for both editing and
animating. I created both basic animations and edited in the software, for
example when I created my basic cut-out character, and animated a walk cycle,
and when I was editing some scenes of my ‘Roundy and Squarey’ animation. The final
of the three main software programs that I learned throughout the year was
Final Cut Pro. Since it is fairly similar to other editing programs I had used
in the past, I got a hold of how to operate it fairly quickly. After being
taught the basic tools and editing features by David, I continued to use it
after doing so, including the editing and introduction of sound to both my
final ‘Larry’ animation, and my ‘Roundy and Squarey’ animation.
A key self-criticism
I do have for myself concerning the year is my almost crippling inability to
keep to a time schedule, as even though I learned how to effectively create
time plans during the year, this does not mean that I stuck to them. This was
due to a combination of, frankly, laziness on my part, and a wayward sense of
motivation; essentially placing me in one of two moods, either I could complete
work in a timely fashion, or little, if any work would get done. Not only did
this affect the developmental work of my projects throughout the year, it also
negatively affected the quality of my animations produced throughout the year,
as several sections were rushed to meet deadlines. This is definitely something
I need to address before next year, as it very nearly made me miss deadlines,
which could have potentially been disastrous towards the completion of the
year. Next year, I plan to keep a balance in place of my work and personal
life, as it is important I do not squander potential opportunities that may
come about because of the course.
Another criticism
I have for myself and my work, is that I all too often leave things until the
last minute to complete, which, when producing animation, simply does not work,
as animation takes a long time to produce and have a final product which looks
good. I feel as though not one of my final animation pieces has lived up to the
design work that I put into it, which is purely down to my own neglect of the
amount of time I should be putting into my animations. This is one of my top
priorities going into next year; to make sure I put an appropriate amount of
time into the production of my animations, instead of passing it off until it’s
too late.
During the
year, I also feel as though I have developed as a person as well as
professionally. I feel as though I am now a lot more comfortable sharing my
work with other people, since this year of the course was the first time I had
actually shared my animation work with anyone. I feel as though the course has
also allowed me to be a lot more comfortable in generally when speaking to
people I don’t particularly know, which may seem like a silly thing to worry
about, however before the year, I was far less open about myself and my work than
I am now, which I believe shows a definite improvement.
Along with
this improvement, I also feel I have become far more able to accurately criticize
and improve my own work, as well as more easily spotting mistakes or poor
decisions that I have made. This has allowed me to more easily improve my work,
in however small ways that I can, allowing me to steadily improve over time.
Overall, I
feel as though I have greatly benefited from this first year of college, both professionally
and personally, for the reasons mentioned. It has allowed me to begin to take
animation and illustration a lot more seriously in terms of production and
development methods, and has also allowed me to become more critical of my own
work, which means I can more easily self-improve.
Monday, 14 April 2014
Work Update #6 - 14/04/2014
Within the past week, I have been working through my animation, by creating environments and animating.
I have now completed the shot I mentioned in the last update, showing the door of Larry's workplace, and then having the camera pan up to the top of the building. I decided to add a sign to the top of the building, with an obviously ridiculous name. I also decided to make the building completely in black and white, to make it look ever so slightly depressing, and to show a contrast between Larry's job, and the rest of the scenes, which look cheery in comparison.

This week, I also decided to touch up the animation in the first scene, of Larry walking, as the animation had Larry skating along the floor somewhat. I also rendered the sections of the animation I had completed, to begin getting ready for the editing phase.
I have now completed the shot I mentioned in the last update, showing the door of Larry's workplace, and then having the camera pan up to the top of the building. I decided to add a sign to the top of the building, with an obviously ridiculous name. I also decided to make the building completely in black and white, to make it look ever so slightly depressing, and to show a contrast between Larry's job, and the rest of the scenes, which look cheery in comparison.
Monday, 7 April 2014
Work Update #5 - 07/04/2014
Recently, I have been constructing the environments in Cinema 4D, and then animating using the model of Larry, and other props I have created.
After testing the compositing technique, I have decided to instead simply create 3D environments, as I feel far more comfortable doing so, as I have a greater amount of experience doing this rather than the relatively little amount of experience I have using 2D/3D compositing.
I have mainly been producing the first main scene, where Larry is walking down the street, to get to his office. However, alongside this I made a short intro scene, of Larry's alarm clock on his bedside table going off, which I plan to add appropriate sound effects to in the editing phase. To create the first scene, I worked from my basic sketches, to create a 3D environment, however I did heavily change the detailing, such as adding a long building in the background, to avoid having a distant horizon, without filling it full of too much detail for such as small space. I also added things like a park path leading away from the concrete path, and a basic window on the building inside the park.
I am also planning to add in a shot of the front of Larry's office, which then pans to the top of the building, however I have not begun work on that scene yet.
Thursday, 3 April 2014
Background Design
For my animation, I need to create both 2D and 3D backgrounds, for the appropriate sections of my animation. I have made basic concepts, but I still need to get my ideas down properly, which is why I am making this post.
The main idea I have for the scene where Larry is walking down the street, is to have a small park next to the route he walks down, as well a building next to said park. These will be fairly light in colour, to contrast the later grey scale colours of Larry's workplace. Larry will walk past the park, which I am intending to have a few trees scattered around a dirt path, which the end of cannot be scene, as it leads out of shot.
After the first main scene, I intend to have a small transition scene, which will likely just have some basic background pieces, such as trees and a skyline.
After this, the final scene is in Larry's office, where Larry will be sitting at his desk, rather like the pose I made for the character sheet. The background for this scene will be a very basic white wall, similar to an office, with the fairly standard analog clock above his head. I may put in a background piece which allows the audience to see a portion of the rest of the office, however this may slightly take away the effect of Larry being sad and alone.
Thursday, 27 March 2014
Compositing in Cinema 4D
Recently I have been experimenting with compositing 2D and 3D images in Cinema 4D. The way I've been doing this is by placing backgrounds into the project, and then adding the photo as a texture. After doing this, I add a camera and adjust the perspective to fit the photo. Once the camera is in position, I add cubes to the project and move the points of them to fit the geometry, while respecting the perspective of the photo. After adding the cubes and getting them in the right position, I add the the photo texture to the cubes, and change the projection to 'frontal'. This makes it so that the texture of the cubes matches the texture of the background. This creates an effect which allows the 2D image to have layers parts, so it can be used in 3D.
One test I have tried is using a New York skyline, and attempting to make the buildings 3D using cubes. I feel it worked well, if slightly strangely put together, and hopefully, now that I am considering using this technique, I can streamline the way I do this.


I may use this technique in my animation, however, since I am very inexperienced with the technique, I may simply opt to create a full 3D background in my animation.
One test I have tried is using a New York skyline, and attempting to make the buildings 3D using cubes. I feel it worked well, if slightly strangely put together, and hopefully, now that I am considering using this technique, I can streamline the way I do this.
I added lighting to the project, to make the changes more notable, seen below. The buildings on the right have been composited, whereas the ones on the left have not, to show the difference between the two.
Wednesday, 26 March 2014
Sound Test
For the sound test that I will be doing, I will likely be using a website I have found called Incompetech.com, which provides royalty free songs that can be used for videos and animations and such. The music is helpfully catagorised and tagged so that I can easily search for the type and style of music I want in my animation. For my animation, I am looking for a somewhat cheerful track, to use when Larry is walking to work. Ideally, I don't want the music to be too obnoxious, rather I want it to add a relaxed backing track, without drawing too much attention. The tags I will be searching with are 'Bright', 'Humorous', 'Bouncy', and 'Uplifting'.

I plan to distort the track, making it so the further the animation progresses, the more distorted the music becomes. Im not entirely sure how I will distort the music; I will test some techniques once the animation portion of the production is complete.
I plan to distort the track, making it so the further the animation progresses, the more distorted the music becomes. Im not entirely sure how I will distort the music; I will test some techniques once the animation portion of the production is complete.
Tuesday, 25 March 2014
Walk Test
To test how my animation will look in 3D, and, if all goes well, to begin animating my scenes, I had to created a basic path, where my character will walk along. I then imported my character model into my new document, and set up a camera in an appropriate position. After doing this, I made a basic walk cycle, to show the movement of the first scene of my animation.
I intend to create a 2D background for this scene, and then use the compositing technique I have experimented with to make it '3D'.

This walk will be the first major scene in the animation, after some introductory scenes. This is because the walk cycle will provide me with three shots, the first being a zoomed in shot of Larry's foot as he steps, the second being a wider shot of Larry, walking down a concrete path next to a road, and the final being of Larry's un-characteristically happy face, as he walks.
I intend to create a 2D background for this scene, and then use the compositing technique I have experimented with to make it '3D'.
This walk will be the first major scene in the animation, after some introductory scenes. This is because the walk cycle will provide me with three shots, the first being a zoomed in shot of Larry's foot as he steps, the second being a wider shot of Larry, walking down a concrete path next to a road, and the final being of Larry's un-characteristically happy face, as he walks.
Artist Research - Tokyo Plastic
Tokyo Plastic are an artistic duo made up of Sam Lanyon Jones and Drew Cope. They primarily create 3D animations, commonly themed around animals, though they have done commercial work for companies like Nokia among others. Examples of their work include 'Catzilla', 'Kitteh Kitteh Scatman', and the MTS series of animations

'Catzilla' is an animation based on a sleeping cat, dreaming of being a Godzilla-like character, whilst attacking a city. The animation is short, being around 40 seconds long, with the majority of the action happening when tanks roll up to stop Catzilla, and it breathes fire on them, destroying the tanks. The camera then switches back to the sleeping cat, and zooms outward, and the it cuts to black. I rather like the models used in the animation, and the way that they are semi-realistic while using very cartoon-like proportions. This could be something that I could try in a later animation, as I am fond of the product. I also particularly enjoy the way the fluff on the cat/Catzilla has been done, as it helps make the cat cute, making Catzilla strangely cute for being a giant killing machine.

The MTS series of animations are adverts created for the company MTS. The animations feature a Buffalo/Bison called Morty, talking to other animals and reacting to various scenarios. The animations generally feature Morty being helpful to the other animals, such as hitting a tree to get acorns, or house-sitting for a squirrel. The main feature of these animations I like are the the characters, and the style of the models and environments.
Monday, 24 March 2014
Walk Cycle - Numeracy Task
When creating a walk cycle, mathematics can and does play a role. In the last module, I was tasked to create a walk cycle with the rigged model I created. I made this using a 40 frame animation cycle, with the key poses taking place on 10, 20, 30, and 40 (or in quarter increments).


If I wanted to create a run cycle, as opposed to a walk cycle, I could speed up the frames, for example, half them, so that the animation cycle ran on 20 frames, and the major points were on 5, 10, 15, and 20 (still working within quarter increments). Obviously, I would have to manipulate the points to make it work better as a run, rather than a fast walk, but the change in timing would be good, and it would make it easier to create a good run cycle.
If I wanted to create a run cycle, as opposed to a walk cycle, I could speed up the frames, for example, half them, so that the animation cycle ran on 20 frames, and the major points were on 5, 10, 15, and 20 (still working within quarter increments). Obviously, I would have to manipulate the points to make it work better as a run, rather than a fast walk, but the change in timing would be good, and it would make it easier to create a good run cycle.
Friday, 21 March 2014
Artist Research - David O'Reilly
David O'Reilly is an artist known for creating primarily 3D animated films. Examples of his work include 'Please Say Something', 'Octocat Adventures', and my personal favourite of his, 'The External World'. As well as these films, O'Reilly has done commercial work creating films for U2, and an episode of the popular cartoon Adventure Time. Whilst his work does delve into other techniques and styles, his 3D work is generally low-poly, and has a very distinctive style.
'The External World' is a 17 minute comedy film, and is essentially made up of many little skits, which come together to create one film. The film draws upon dark humor a lot, using what would normally be tragic events or scenarios to create humorous results. The film is very surreal, and is in the very recognisable low-poly style usually seen in O'Reilly's work. I personally enjoy the film because of the way it uses dark humor and very abstract scenarios, such as the teacher trying to get the student to learn piano, which eventually culminates in the teacher smacking the student with the butt of a gun, and then the student shooting the teacher. In the final scene, a ghostly hand has been handcuffed, so that it cannot hit the boy whilst he is playing to the characters seen throughout the film. I also particularly like the range of colours used in the film, and the referential humor used, such as a homeless person trying to get coins by jumping into a brick block, imitating Mario. The use of bright colours is something I may choose to strive for in my animations, as this is something I particularly enjoy throughout the animation.

'Please Say Something', is set in the future, and follows the characters of a cat and mouse, who live together, and are in a troubled relationship. During the film, the two main characters have trouble getting along with one another, and go between being passive with one another and fighting several times. Occasionally in the film, the mouse will go to make a decision, and the film will carry on, but later rewind, as the mouse does not like the consequences. One such time is when the cat decides to leave, and the mouse does not try to stop it, and doesn't seem to care. However, the film progresses, with the mouse at his laptop, and as he goes to the TV, he realises the cat had the remote, so the film rewinds, and the mouse winks at the camera as the cat goes to leave him. The film tends to mainly use black and white imagery, while using dashes of colour, which does give it a nice effect, and is a useful tool for highlighting important pieces of the animation, such as characters and props (as seen with the scarf the cat is given).

Octocat is a very strange animation, based on the character of Octocat, trying to find his parents. A very large part of the animation is made using very, very basic drawing, similar to the style of very quick drawings made in MS Paint. I'm not overly fond of this portion of the animation, however I do like the way in which it is able to show movement and so on, while using basic imagery, and does have a certain humour to it. Octocat searches far and wide for his parents, meeting several character along the way, until he meets one particular character which makes fun of him for having no parents. At this point, Octocat transforms, and along with it, the animation style changes, now being in 3D, in O'Reilly's signature style. Octocat seemingly destroys the entire surrounding's, and the screens fades out. After this, Octocat is seen sadly walking through a forest, alone, when the camera pans up, and the audience see what is presumably Octocat's parents.

'The External World' is a 17 minute comedy film, and is essentially made up of many little skits, which come together to create one film. The film draws upon dark humor a lot, using what would normally be tragic events or scenarios to create humorous results. The film is very surreal, and is in the very recognisable low-poly style usually seen in O'Reilly's work. I personally enjoy the film because of the way it uses dark humor and very abstract scenarios, such as the teacher trying to get the student to learn piano, which eventually culminates in the teacher smacking the student with the butt of a gun, and then the student shooting the teacher. In the final scene, a ghostly hand has been handcuffed, so that it cannot hit the boy whilst he is playing to the characters seen throughout the film. I also particularly like the range of colours used in the film, and the referential humor used, such as a homeless person trying to get coins by jumping into a brick block, imitating Mario. The use of bright colours is something I may choose to strive for in my animations, as this is something I particularly enjoy throughout the animation.

'Please Say Something', is set in the future, and follows the characters of a cat and mouse, who live together, and are in a troubled relationship. During the film, the two main characters have trouble getting along with one another, and go between being passive with one another and fighting several times. Occasionally in the film, the mouse will go to make a decision, and the film will carry on, but later rewind, as the mouse does not like the consequences. One such time is when the cat decides to leave, and the mouse does not try to stop it, and doesn't seem to care. However, the film progresses, with the mouse at his laptop, and as he goes to the TV, he realises the cat had the remote, so the film rewinds, and the mouse winks at the camera as the cat goes to leave him. The film tends to mainly use black and white imagery, while using dashes of colour, which does give it a nice effect, and is a useful tool for highlighting important pieces of the animation, such as characters and props (as seen with the scarf the cat is given).
Octocat is a very strange animation, based on the character of Octocat, trying to find his parents. A very large part of the animation is made using very, very basic drawing, similar to the style of very quick drawings made in MS Paint. I'm not overly fond of this portion of the animation, however I do like the way in which it is able to show movement and so on, while using basic imagery, and does have a certain humour to it. Octocat searches far and wide for his parents, meeting several character along the way, until he meets one particular character which makes fun of him for having no parents. At this point, Octocat transforms, and along with it, the animation style changes, now being in 3D, in O'Reilly's signature style. Octocat seemingly destroys the entire surrounding's, and the screens fades out. After this, Octocat is seen sadly walking through a forest, alone, when the camera pans up, and the audience see what is presumably Octocat's parents.

Wednesday, 19 March 2014
Animation Idea for the New Module
The idea I have came up with for my animation in the new module uses my character Larry, the office worker. The animation is based around Larry's hopes for a better, more welcoming workplace. The animation starts with Larry walking to work; the sun is shining, Larry is whistling, and everything seems disgustingly perfect. As Larry is walking along, I plan to have various things happening in the back ground, the nature of which is undecided. As Larry progresses, he reaches his workplace, and cheerily enters through the main door. Larry throws off his hat, and heads towards his desk, as he reaches his desk, the animation cuts, and then shows Larry, head on hand, suddenly come to his senses, and realise he's still in his god awful, boring, low paying job.
During the animation, I plan to use both 3D and 2D animation, using both the 3D model of Larry I created, and the assets that I made for the character sheet. I am still unsure of which sections I want in 3D or 2D, but it will likely be that the animation will be split at the point where Larry realises that he was day-dreaming. I will be using Cinema 4D to animate in 3D, and most likely after effects to work in 2D.


During the animation, I plan to use both 3D and 2D animation, using both the 3D model of Larry I created, and the assets that I made for the character sheet. I am still unsure of which sections I want in 3D or 2D, but it will likely be that the animation will be split at the point where Larry realises that he was day-dreaming. I will be using Cinema 4D to animate in 3D, and most likely after effects to work in 2D.
Monday, 17 March 2014
New Module - Work Based Learning 1
During the week off, we were tasked to begin work on a project proposal for a new module, that we would be presenting to the class on the thursday of the week back. While I did start work on the proposal, I couldn't fully follow the work guide as I was finding it difficult to answer some of the questions, such as the section on budget. This was more based on not being able to write things related to my project, rather than the questions themselves.
However, I did complete a fair amount of the proposal, including a background of myself and my style of work, a basic overview of the idea for the project, and a list of the tasks that need to be completed for he project.
For the animation I will be producing in this module, I will be using my character Larry, the office worker from the last module I completed. I will likely be utilising both the 3D model I created for Larry, as well as the assets from the character sheet I created. I will be creating another post explaining my idea in further detail.
Work Update #4 - 17/03/14
Since last week, the few main tasks I needed to complete were the Project Proposal and the treatment. While I did complete a majority of the Project Proposal, I struggled to fully grasp how a few of the sections would affect my project, such as the budget, which did stump progress somewhat. However, I did complete the majority of the sections for the proposal, ready to be converted into a PowerPoint presentation when I return to college. I will then be presenting this to David, the rest of my class, and potentially others.
Monday, 10 March 2014
Work Update #3 - 10/03/14
Throughout the last week, I have been trying to finalise both the Digital Skills Acquisition module and the Contextual Studies module, for the hand in last Friday. This mainly involved completing the objectives that I set last week, though other tasks were needed to be completed for hand in.
I started the week by trying to finish the rigging of my character, which I did. The only sections of the model I had left by the end of the previous week were the legs and feet, so even though these are the trickiest areas in my opinion, it did not take that long to complete. Completing the rig allowed me to complete a basic walk cycle for my animation; completing another of my personal objectives, as well as one of the module objectives. However, even after completing this walk cycle with my character, I decided to add more detail, which involved texturing Larry, to somewhat match the character sheet. How I did this was later detailed in my making of guide, for the 3D model. Once I had added more detail to the model, I created another walk cycle, but this time it was slightly more fluid, and looked better in my opinion. Having completed this, I rendered the animations, and they were ready to be put onto a disc, and handed in.
Having completed two of my objectives, I moved onto the third, which was to finish off all the work on my character sheet. To do this, I needed to add the pantone colors to the sheet in some fashion, as well as writing a short background to Larry. Once I had completed this, it was later detailed in my making of guide for my character sheet.
The fourth and final objective I set for myself was to complete the 1500 word essay, on one of the areas I had already studied. I chose 3D animation for my essay, and wrote about several topics within the essay; expanding upon my previous 300 word section. After completing this, I printed both the 300 word sections, and the 1500 word essay, and had it printed and bound.
However, even after completing my previously set objectives, I realised I needed to finish my development 'making of' guides, for both the character sheet and the 3D modeling and rigging process. I did this by detailing the methods and process I used throughout the module to complete tasks set, accompanied by screenshots showing the progress I was making. After completing these I had them printed and bound, ready to be handed in.
Another thing I needed to do was mount my character sheet on foam board, which I completed on Friday, as it was a fairly simple task.
Once these tasks were complete, I was more or less ready to hand my projects in, which I did on time.
My main targets for next week are:
- Complete Project Proposal for the next module
- Complete a Treatment document for the module
Monday, 3 March 2014
Work Update #2 - 03/03/14
Over the past week I have been working on several different projects. Over the week, I worked towards the objectives that I set myself last week. The first objective that I aimed to complete was the completion of my character sheet poses. This meant adding the hands and hair to the existing poses, as well as adding a third and final, more dynamic pose. The first two poses were simple turn-around poses; from the front and side, with the third pose being of the character sitting at a desk, bored, staring forward, with a glum expression. The (current) final three poses can be seen below.

After completing after the character sheet poses, began work on my character model rig. Doing this involves follows the instructions in the guide that was given to me by David. I am currently about hallway through the booklet, having just moved on to inserting the ankle, heel, and toe nulls, and moving them into place.

During the week, I also began finalising work on my 300 word sections for the research portion of the current projects. This involved carrying out research on several areas, such as pixellation, stop motion (with this, to an extent, clay-mation), and 3D. This allows me to now chose one of these areas and expand on it, with a much more detailed 1500+ word section of writing, based on the current research.
I also continued work with my print design, adding a border, as well as more detail into the background. I felt I needed to add a background design, as the project as a whole looked as if all of the pieces were floating in white space, and I wanted to fill this space with something more interesting. I am currently deciding on whether this should be the final version, or whether I want to add any more detail. The current state of the project can be seen below.

Having completed the poses for my character sheet, began work on my character rig, and having completed the initial research portion for my project, I have completed all the objectives that I set myself last week.
My new targets for this week are:
After completing after the character sheet poses, began work on my character model rig. Doing this involves follows the instructions in the guide that was given to me by David. I am currently about hallway through the booklet, having just moved on to inserting the ankle, heel, and toe nulls, and moving them into place.
During the week, I also began finalising work on my 300 word sections for the research portion of the current projects. This involved carrying out research on several areas, such as pixellation, stop motion (with this, to an extent, clay-mation), and 3D. This allows me to now chose one of these areas and expand on it, with a much more detailed 1500+ word section of writing, based on the current research.
I also continued work with my print design, adding a border, as well as more detail into the background. I felt I needed to add a background design, as the project as a whole looked as if all of the pieces were floating in white space, and I wanted to fill this space with something more interesting. I am currently deciding on whether this should be the final version, or whether I want to add any more detail. The current state of the project can be seen below.
Having completed the poses for my character sheet, began work on my character rig, and having completed the initial research portion for my project, I have completed all the objectives that I set myself last week.
My new targets for this week are:
- Finish my character rig
- Complete at least one basic walk animation with rigged character model
- Finish my character sheet (add additional information on character and colour info
- Start and complete the 1500 word portion of the written work
Monday, 24 February 2014
Work Update #1 - 24/02/14
Recently, I have received the rigging guide, and have begun to work through the document. The guide shows how to rig characters in Cinema 4D, which creates a skeleton inside the model, that allows me to manipulate each part of the character. Using this skeleton, and the manipulation it allows, I will be able to animate my 3D character, achieving at least a basic walk cycle once the rigging is complete.
I have also recently been working on my character sheet in Illustrator, working on the turnaround poses. Adding colour to the current poses have been the most recent changes, along with adjusting the length of his legs, which I thought were too short for the length of the body. I have yet add a few of the features on the front and side poses, as I am leaving the more complex features, such as the hands and face, until the basic shape work is complete.
As a side project, I have been working on a print design, of a slime monster in a sewer. For the style of the design, I took some inspiration from the work of Charles Burns, in regard to the style of shading. There is still more to add to this project, as I want to, at some point, add a border around it, and add in a bit more detail.

Objectives for completion:
I have also recently been working on my character sheet in Illustrator, working on the turnaround poses. Adding colour to the current poses have been the most recent changes, along with adjusting the length of his legs, which I thought were too short for the length of the body. I have yet add a few of the features on the front and side poses, as I am leaving the more complex features, such as the hands and face, until the basic shape work is complete.
As a side project, I have been working on a print design, of a slime monster in a sewer. For the style of the design, I took some inspiration from the work of Charles Burns, in regard to the style of shading. There is still more to add to this project, as I want to, at some point, add a border around it, and add in a bit more detail.
Objectives for completion:
- Work through as much as the rigging guide as possible
- Complete turnaround poses for character sheet
- Complete 300 word sections for written content
Wednesday, 12 February 2014
Gangpol & Mit
Recently, for the module in which I have to create a character, model sheet, and 3D model, I have been researching a pair of artists known as Gangpol and Mit, a french duo who work together to create animations, commonly set to music. Gangpol, as I understand it, works on the audio aspect of the animations, while Mit works on the visual aspect of the animations. This led to their motto being, 'Sonic and Visual in love'.

Their visual style is based upon the use of vividly colourful geometric shapes to create characters and environments, while the audio is typically based on electronic music. An example of their work I particularly enjoy, which I think shows off their style well, can be seen below:
http://vimeo.com/2992575#at=0
I have been mainly using their blog to research them, as this has a variety of information, and a good selection of animation examples. Their blog also has updates from them, on what they are currently working on, such as coming exhibitions, and their 'videos' page also shows their previous work. Their blog can be found at:
http://gangpol-mit.blogspot.co.uk/
Using the research I have carried out, I hope to use this to influence how I create my character for the current module; for both the model sheet, and the 3D model itself.
Wednesday, 5 February 2014
Introduction
Hi, my name is Alastair Blackburn, and I currently attend Newcastle College, studying Animation and Illustration. From now, I will be posting updates and progress on my college work here, including development work, production, and final products. However, it may also feature work that I am interested in outside of college, such as artists and illustrators that I like, or work that I find appealing.
Subscribe to:
Comments (Atom)